Decoding the white-face result after Photoshop Auto Blend
A white or blank face after Edit > Auto Blend Layers is never random. It traces back to one of four diagnosable conditions: an all-black layer mask hiding the face, a feathered selection that deleted pixels before blending, an incompatible layer type, or a Content-Aware Fill setting that flipped between sessions. Each has a specific fix. And there is a fifth situation, anime or illustrated source art, where Auto Blend cannot work at all. Find your cause below, apply the matching fix, then run the pre-flight checklist so the problem does not return.
What the white-face result actually means
Auto Blend Layers was built to stitch panoramas: collections of similar photographs joined along seams. A face swap asks it to do something it was never designed for, and that architectural mismatch sits underneath most of these failures. The tool only blends overlapping content into a smooth transition. Force it onto a mismatched composite and it manufactures fill instead of blending.
When the result comes back white or blank, the cause is one of four things. The face layer is hidden behind a mask. Pixels were deleted before the blend ran. The layer type is one Auto Blend refuses to process. Or a Content-Aware Fill option changed since your last session.
First, confirm you are reading the right article. A white face is not the same symptom as a harsh visible seam, a grid-like pattern, or no change at all from the original. Those are separate Auto Blend failures with separate fixes. If your face area is filled with flat white or empty space, you are in the right place.
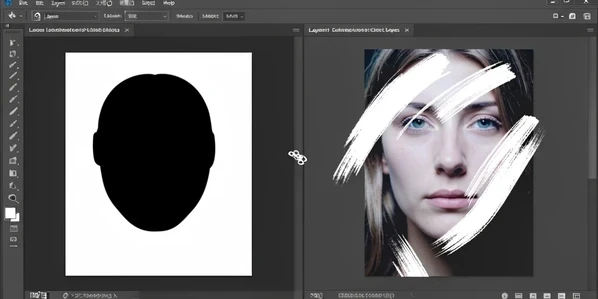
Cause 1: an all-black layer mask is hiding the face
Open the Layers panel and look at the mask thumbnail beside the face layer. A solid black rectangle means the mask hides every pixel on that layer, so after Auto Blend the face reads as empty white space. A fully black mask makes the whole layer invisible, which is exactly what produces the blank result.
- Click the black mask thumbnail once so the mask, not the layer image, becomes the active target.
- Press D, then X, to set the foreground color to white.
- With the Brush Tool, paint across the face area to bring the hidden pixels back into view.
Keep one rule in your head and mask logic stops being confusing: black conceals, white reveals. That also answers the frequent worry about a white mask. White is the normal, fully visible state, so when your face is missing you want more white painted in, not less.
Cause 2: a feathered selection deleted pixels you could not see
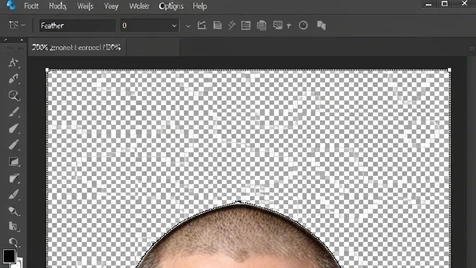
This one is sneaky, because the damage stays invisible at normal zoom. If your Lasso carried a feather value when you cut the face out, pressing Backspace deleted more than you intended, and Auto Blend filled those transparent holes with white.
Here is the mechanism, drawn from the Adobe community discussion of this exact bug. A feathered selection fades from 100% selected at the inner edge down to 0% at the outer edge. Anything below 50% sits outside the marching ants, so it looks unselected. It is still partially selected, and it still gets deleted on Backspace. The visible boundary lies to you.
Want proof? Zoom to 200% right after you delete. You will see transparent pixels reaching past the contracted selection line, into territory the marching ants never marked.
Contracting the selection by 2 to 20 pixels will not fix this. If the feather value is non-zero, no amount of contraction removes the transparent fringe, because the feather, not the contraction, is what bleeds the deletion outward.
The fix takes two seconds. Before you draw any selection, set the Feather field in the tool options bar to 0, then redo the selection and the deletion. Reset it at the start of every session, since Photoshop remembers the last value you used.
Cause 3: the layer type is one Auto Blend refuses to process
Auto Blend Layers runs on rasterized RGB or Grayscale image layers and nothing else. The blocked types are spelled out clearly: Smart Objects, video layers, 3D layers, and background layers all stop it cold.
Spot them in the Layers panel. A Smart Object carries a small page badge in the corner of its thumbnail. A background layer shows the word Background in italics with a lock icon.
- Rasterize a Smart Object with Layer > Rasterize > Smart Object.
- Turn a background layer into an editable layer by double-clicking it and clicking OK.
- Open Image > Mode and confirm RGB Color is selected.
That color-mode check matters more than it looks. When blending options seem dead or Auto Blend does nothing, a non-RGB document is a frequent culprit. Switch the mode to RGB Color first, then run the blend again.
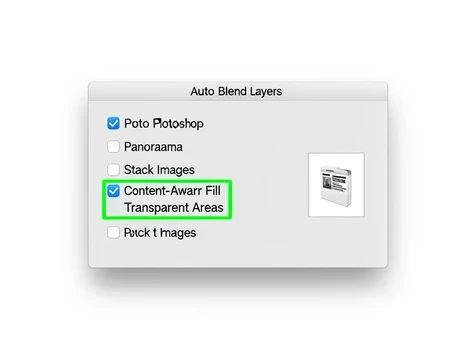
Cause 4: the Content-Aware Fill toggle changed between sessions
Did Auto Blend work yesterday and break today after a restart? Look at the Content-Aware Fill Transparent Areas checkbox in the Edit > Auto Blend Layers dialog. Its state can drift between sessions without you touching it.
That checkbox decides how transparent regions get filled. Flip it and Photoshop changes its fill behavior; in some cases it creates no merged layer at all, which reads on screen as a white or absent face. The Adobe community documented this as a session-state quirk rather than user error.
To fix it, run Auto Blend once with the box checked and once unchecked, then keep whichever produced the clean result and leave it alone going forward. This behavior was confirmed in Photoshop 21.1.1 on macOS 10.15.3, and likely reaches other versions too.
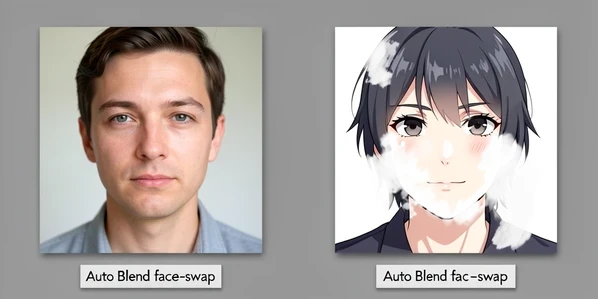
Special case: why Auto Blend always fails on anime and illustrated art
If your source images are anime, comics, or any illustration, stop testing settings. Auto Blend will not produce a usable result no matter what you change.
The reason is structural. The tool stitches similar photographs along seams and reads photographic gradients to do it. Hand it flat illustrated color and, per the graphic-design community thread on this problem, it wrecks color across the whole canvas, not the face alone. Where the seam fill meets source images that differ sharply in color or texture, it invents content that surfaces as white patches or color bleed.
For these images, mask by hand. Add a layer mask, paint the edges with a black Brush, and clip a Curves adjustment layer to the face to match color and lighting. The full steps sit in the manual fallback below.
Pre-flight checklist before you run Auto Blend
Run through this before you press OK. Every item that is true removes one path to the white-face result.
- Feather is set to 0 in the tool options bar.
- No face layer carries a solid black mask thumbnail.
- Every layer is rasterized RGB or Grayscale, with no Smart Object badge, video, 3D, or italic Background label in sight.
- Both layers sit at Normal blend mode, 100% opacity.
- The face and body layers actually overlap on the canvas, giving the blend something to work with.
- Document color mode is RGB.
Manual face-swap fallback when Auto Blend keeps failing
Reach for this when all four fixes came up empty, or the moment you see illustrated source art. It is slower than Auto Blend and far more predictable.
- Drag the face layer above the body and position it over the target face.
- Add a layer mask, then paint the outer edges with a soft black Brush so the face melts into the surrounding skin.
- Create a Curves adjustment layer, clip it to the face layer by Alt-clicking the boundary between them, and nudge the curves until tone and brightness match the body.
One caveat holds for any blend method, manual or automatic. When the source face and the destination body were lit very differently, only manual Curves correction reconciles them. Auto Blend cannot fix a large lighting mismatch on its own, so plan to push curves by hand whenever the light directions disagree.
this whole 'four diagnosable causes' framing reads like a press release. in practice auto blend just stalls on anything past a panorama and you sit there waiting
speed was never its strong point. ran it on a 6200px composite last week, sat for ~40s and handed me a white blob anyway tbh