Your swapped head is the wrong shape: here is the fix per medium
Sometimes a head swap fails for a reason no color or sharpness fix can touch: the head is simply the wrong shape for the body. The outline runs past the shoulders, the neck does not meet the seam, or the jaw and hairline land where the original face never sat. The repair depends entirely on the medium. In Photoshop you reshape and reseat the head. With dolls you warm the vinyl and refit it. In Source Filmmaker you lock the scale. In After Effects you reconcile the motion. Start by deciding which of those three boundaries actually broke.
How to tell why the head shape does not fit
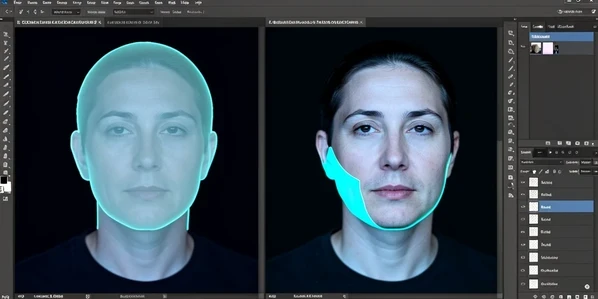
Drop the pasted layer to about 50% opacity, then toggle the layer eye on and off. The translucent version shows you exactly how the new outline sits over the original head, and theclickcommunity recommends this as the first alignment move for a reason. You can see overhang and shortfall at a glance, before a single pixel gets warped.
Now zoom in and walk the seam. Watch the edges, any fabric patterns, and the skin texture as you flick visibility on and off. You are sorting the failure into one of three buckets.
- Outline mismatch: the whole silhouette is wider, narrower, or taller than the head it replaced.
- Neck and shoulder seam: the head reads fine, but the neck width or shoulder line refuses to meet the body.
- Jaw and hairline: the donor's jaw or hairline lands off the original boundary, so the face feels grafted on.
That single decision dictates everything downstream. An outline problem needs reshaping. A seam problem needs repositioning and cloning. A boundary problem needs masking discipline along the jaw and hair. Skip this triage and you will spend an hour blending a head that was never going to fit.
Reshape a mismatched head in Photoshop (Liquify, Warp, Free Transform)
Blending will not save an outline that is the wrong shape. You have to physically bend it. Before anything else, select a much larger area than the face alone. theclickcommunity stresses this: grab more surrounding pixels than you think you need, because reshaping eats into the margins and you want material left to blend.
Rough-align first. Use the move tool to drop the head into place, then Edit > Transform > Rotate to match its axis to the shoulders. Only once the head sits roughly right do you reshape. Open Liquify and push the silhouette inward or outward with a large, low-pressure brush, or use Transform > Warp to drag the outline grid toward the target shape. A too-wide donor head narrows cleanly here, and the before/after difference is dramatic once the silhouette finally tracks the body.
Mask with care. Add a white layer mask and paint black with a brush at 100% opacity and 0% hardness, which feathers the transition so the head melts into the body. Raise hardness only as you trace a genuine edge, like the line of the jaw or a hard collar. Then flatten. If a seam still shows where the reshaped outline does not quite agree with the body, sample nearby pixels with the Clone tool and paint over it.
A 0%-hardness brush is the difference between a head that sits in the photo and one that floats on top of it. Hardness is for edges, softness is for everything else.
Fix the neck and shoulder seam
Here the head shape is fine. The neck is the troublemaker. A donor neck that is narrower or wider than the body leaves a visible step right at the shoulder line, and no amount of reshaping the face addresses it.
Reposition first with the move tool, then Edit > Transform > Rotate to line the neck up with the body's, exactly as the chapelboro walkthrough sequences it. Flatten the file. Now the seam is just pixels, so treat it like any other blemish: Clone nearby content over it, sampling whatever sits next to the gap, whether that is background wall, a couch cushion, or clothing. Build the cover from real neighboring texture rather than a smear.
Clean the cutout afterward. The regular lasso refines a rough selection well: hold SHIFT to add to it and ALT or OPTION to subtract, zooming in to chase stray pixels along the edge. Patience at this stage is what keeps the seam invisible at full resolution.
Fix an incompatible doll head and body
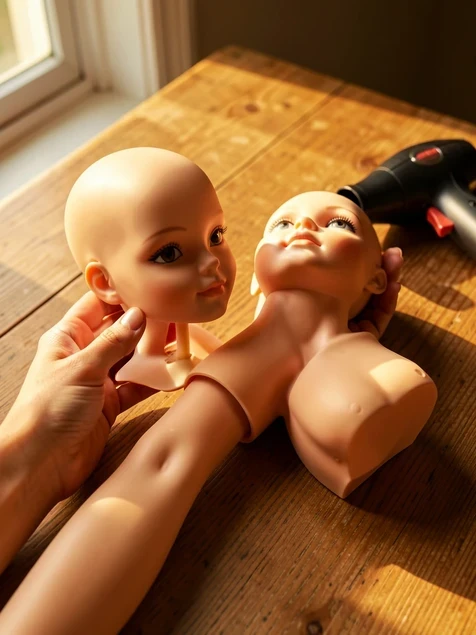
Physical swaps fail on shape too, and vinyl does not forgive guesswork. Before you commit or buy anything, hold the loose head against the donor body's arm and neck. margaretann's tutorial puts the dolls side by side first to read both fit and skintone, and that ten-second check spares you a mismatched body you cannot return.
Vinyl is rigid when cold, so warm it before you pull. Run a hairdryer over the plastic around the neck for roughly one minute to soften it, then ease the head off gently so the inner peg does not snap. If it resists, keep warming in 30-second bursts until the vinyl is soft and pliable, and rock the head side to side while pulling upward rather than yanking straight up. A 16-inch doll needs a longer warm-up, since the bigger head simply holds more material.
One caution worth repeating before you reach for heat. Integrity Toys states plainly that the body-swap procedure is done at your own risk, and that they will not be held responsible for injuries or damage to your dolls. Warming and pulling vinyl can crack a peg or mark the finish, so weigh that against the value of the doll first.
Fix head shape and scale in 3D and motion swaps
Scale, not shape, is usually the culprit in 3D and video. In Source Filmmaker the donor head ends up oversized or undersized for the new body, and worse, a rig can reset it the moment you apply one. The fix is a deliberate sequence the steamcommunity guide spells out.
- Add a scale control to the head and Remap Slider Range so the values are usable, for example 10 to 100.
- Resize the head to the size you want against the body.
- Scale the donated body to the exact same value the first head was set to, which is what locks the head in place.
- Order matters: equip the rig before locking the head, or rescale the head again after rigging if it disappears.
That disappearing-head moment trips up most people once. You rig, the head vanishes, and it looks like the model broke. It did not. The rig reset the scale, and resizing the head again brings it right back.
Motion is a different animal. A still face pasted onto a moving body in After Effects reads as fake because the face never moves with the footage. For that, generate and manipulate a motion vector map, or lean on morphing and a plug-in like RE:Flex to push the static face along the body's movement. There is no one-click version of this, but a motion vector map is what reconciles the two layers.
When to reshape, reshoot, or abandon the swap
Not every shape can be salvaged, and knowing when to stop saves real time. The deciding factor is usually how much image data you have to work with. Edges that pixelate or smear the instant you warp or clone are telling you the source is too thin to reshape.
Reshape when the outline is close and you started from full-size originals rather than low-res JPGs exported from Lightroom, because there is enough data to bend and blend. Reshoot when the two photos were taken far apart and the light direction or background fights you at every seam. Pick two frames shot close together so lighting and backdrop already agree. Abandon and restart when the head smears under the first warp, since no masking rescues missing pixels.
Prevent the whole problem next time at the raw stage. Bring both photos into Adobe Camera Raw together and apply identical white balance, clarity, and exposure before you ever cut the head out. Matching the light up front means the shape fix is the only fix you have to make.